

Are you a curious and tech-savvy individual who is well-versed in the art of building and gaming on your very own PC? Perhaps, during your escapades into the depths of computer settings, you have stumbled upon the concept of "fan curve" and are now consumed by a burning curiosity to unravel the mysteries surrounding it. If that's the case, then you are in the right place.
Why is a fan pc curve so important, and how does it impact your PC's overall performance and longevity?
It's a simple mechanism that detects and regulates the heat of your device. Once your computer's temperature reaches a threshold level, the fan spins to bring the temperature down. In essence, a fan curve is a graphical representation that exhibits the rate of rotation of a computer's cooling fan at varying temperatures.
Now, how can you set a fan curve that's best suited to your needs? The process may vary depending on your motherboard and BIOS settings. After reading this blogpost, you'll be able to answer these questions:
- Ways to set up
- How to read and adjust
- How to know the right amount of curves
- Does it decrease the temperatures of CPU/GPU
- Does high fan curves increase noise
How to Read and Adjust Fan Curves
Alright, so you've figured out how to configure a curve for fan on your trusty PC. But did you know it's equally important to know how to read and tweak it? Yes, you heard it right. You see, it's paramount that you master the skill of reading and tweaking fan curves to ensure your computer's optimal efficiency and noise reduction.
Now, let's delve deeper into the nitty-gritty details of fan curves, shall we? This section will explore how to read and adjust these critters through the BIOS and several popular third-party software options. From the arcane BIOS to the more user-friendly third-party software, we've covered you on all fronts.
Reading And Adjusting Fan Curves Through The BIOS
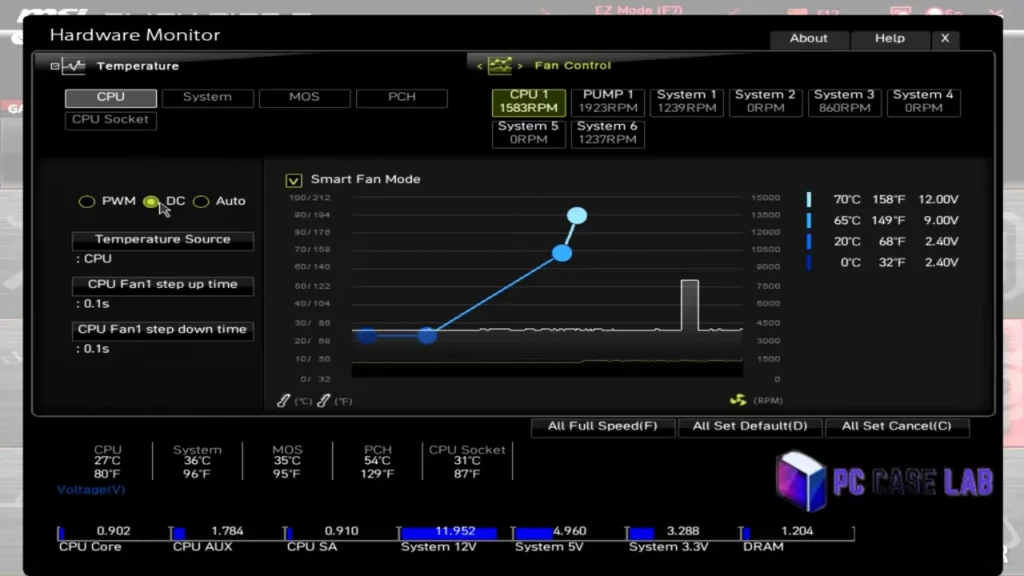
With the help of this step-by-step guide, you can adjust your PC fan curves through BIOS like a pro in no time. Here's how:
- Restart your computer and enter the BIOS settings by pressing a specific key during startup. (Hint: it's usually F2, F12, or Delete, but double-check your manufacturer's instructions to be sure.)
- Once you've entered the BIOS settings, navigate to the fan settings section and locate the fan curve graph. This graph can be overwhelming at first glance but don't worry. We'll break it down step-by-step.
- Take a look at the points on the graph where the fan speed changes. These points represent the different temperature ranges at which the fan will speed up or slow down. The steeper the curve, the faster the fan will spin to cool your PC.
- Ready to adjust the curve for pc fan to your liking? Use the arrow keys to select the point you want to adjust and press Enter. From there, you can adjust the fan speed for that temperature range using the arrow keys.
- Once you've made your desired adjustments, save your changes and exit the BIOS settings.
Reading And Adjusting Fan Curves Through SpeedFan Software
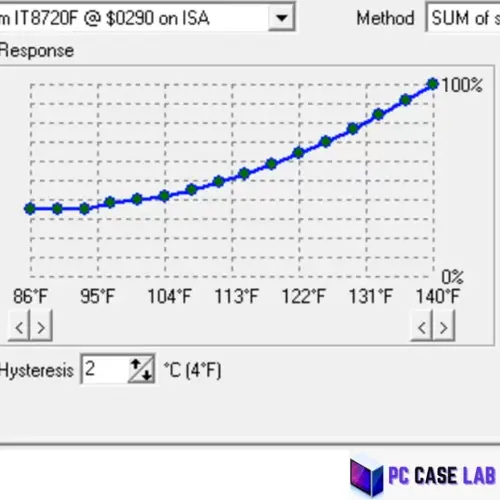
SpeedFan is a popular third-party software option for adjusting fan curves. Here's how to read and adjust through SpeedFan:
- The first thing you need to do is download and install SpeedFan from the official website. This might seem like a no-brainer, but trust me, you want to ensure everything runs smoothly.
- Once you have SpeedFan up and running, select the "Configure" tab. This is where the magic happens.
- Next, you need to select the fan you want to adjust from the drop-down menu. Don't worry if you have multiple fans; you can adjust them all individually.
- This is where things get a little tricky. You need to click "Edit" to access the fan curve settings.
- Now that you're in the fan curve settings, you can adjust the fan speed at different temperature points by dragging the points on the graph.
- Once you've adjusted to your liking, click "OK" to save your changes.
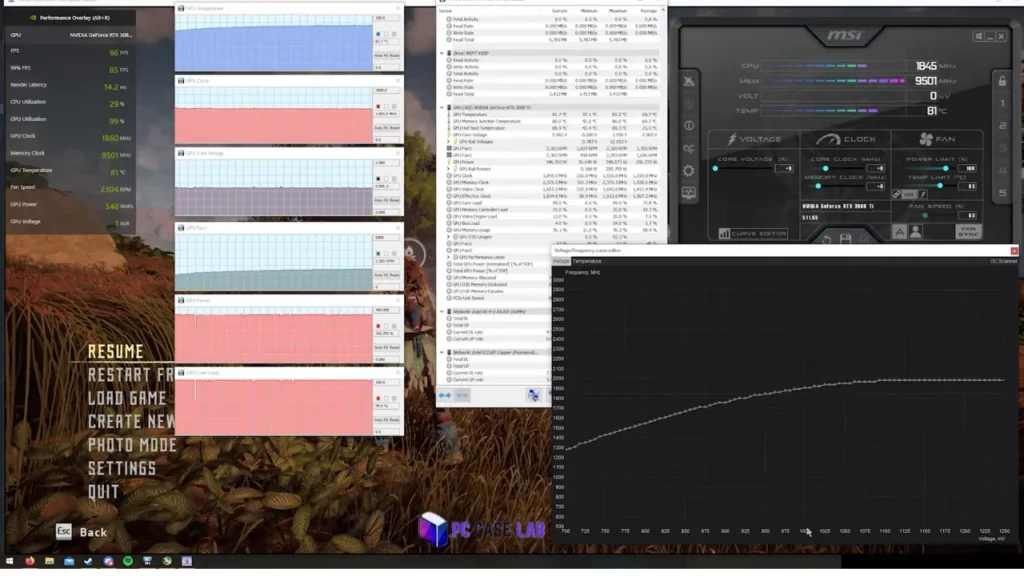
Reading and adjusting fan curves through MSI Afterburner
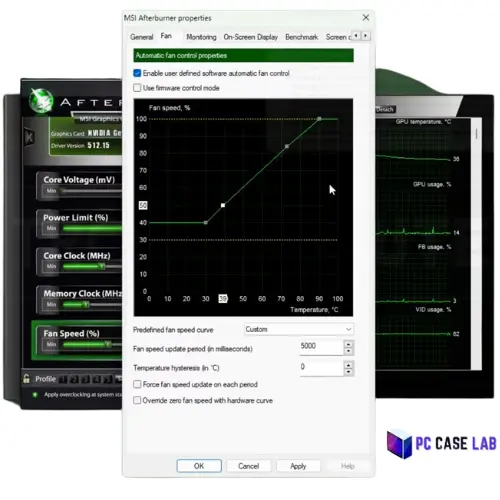
MSI Afterburner is a popular software option for overclocking your graphics card but also allows you to adjust fan curves. Here's how to do it:
- First things first, head on over to the official website and download MSI Afterburner, a nifty little tool that lets you tweak your graphics card's settings.
- Once you've installed MSI Afterburner, launch the application and gaze upon the myriad of options before you.
- Locate the "Settings" button; it's probably staring you right in the face, and click it. You're one step closer to adjusting that fan curve.
- You should see a bunch of tabs on the left side of the screen; click on the one labeled "Fan." This is where the magic happens.
- Look at the graph in front of you and take a deep breath. See those points? Those are your ticket to fan curve bliss. Click and drag them to your heart's content, adjusting the curve to your liking.
- Once you've achieved fan curve nirvana, don't forget to hit "Apply" to save your changes. You want all that hard work to go to good use.
Reading and adjusting fan curves through Fan Control
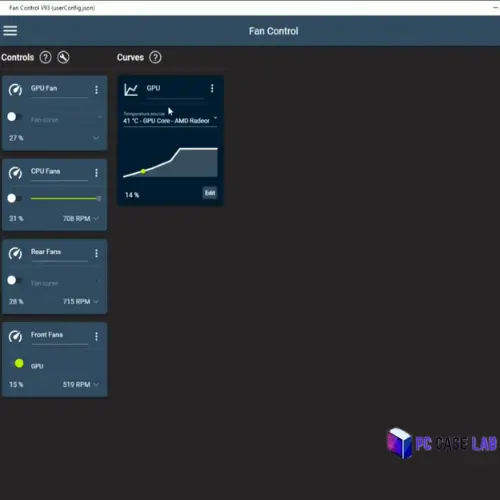
Fan Control is another popular third-party software option for adjusting fan curves. Here's how to read and adjust fan curves through Fan Control:
- The first step is downloading and installing the Fan Control software from the official website. Make sure you get the latest version to ensure compatibility with your system.
- Once you have Fan Control installed, launch the application and select the fan you want to adjust.
- Now, here's where things get more complex. You'll need to adjust the fan speed at different temperature points by dragging the points on the graph. This will create a custom fan curve allowing your system to cool down as needed.
- Don't worry if you feel a bit lost at first. Adjusting fan curves can be tricky. But with a bit of trial and error, you'll find the sweet spot that works for your system.
- Finally, when satisfied with your custom fan curve, click "Apply" to save your changes. And that's it. You're all set.
Choosing the Correct Temperature Sensor for Your Fan Speed Curve
Choosing how fast to run your fan is only one-half of the equation. The other half of the equation is choosing what temperature sensor will trigger the fan speed to increase, and a large number of builds do this incorrectly.
Most BIOS setups will map fan speed curves using CPU temperature as their source. CPU temperature will work well with fans used to cool CPU coolers. However, if you are using this as the sole source of input for your case fans, there will be a significant blind-spot created. Your CPU may be running perfectly cool, but your GPU may be at 85°C and pushing all its heat into the case. The case fans would never know.
Using GPU temperature as your fan speed curve source will correct this issue for those builds intended for gaming use cases; however, BIOS cannot directly read GPU temperature. You will need to utilize software such as Fan Control to access this data from the GPU sensor.
For most gaming builds, the best configuration option is a "Max" mixed sensor. This is an advanced feature found within the Fan Control application. A "Max" mixed sensor allows you to choose two separate temperature sources (commonly CPU & GPU) and assign the fan speed curve to whichever source of temperature is running hottest at any point in time. When playing a GPU-heavy game, the case fans will increase in speed due to the GPU temperature. When compiling or rendering code, the case fans will increase in speed due to the CPU temperature.
To configure Fan Control to utilize a "Max" mixed sensor:
- Click the + button to create a new temperature sensor.
- From the dropdown menu, select Mix.
- Select both your CPU and GPU sensors.
- Choose Max for the function of the sensor.
- Map the "Max" mixed sensor to your case fan speed curve.
This change to your setup will allow your case fans to respond to your true workloads, not just half of them. If you are building a compact ATX system and have limited thermal headroom, mixed-sensor control will make the difference in providing truly responsive case fan performance.
How To Know The Right Amount Of Fan Curves & Factors That Impact The Temperature
When it comes to setting the right fan curve for your computer, it's essential to strike a balance between performance and noise. In this section, we'll discuss how much fan curve is necessary and how to determine the right amount for your computer, as well as factors that impact temperature, including dust and debris, and essential "don'ts" to keep in mind.
How Much Fan Curve Is Necessary?
When it comes to your computer's fan curve, numerous factors must be considered. For one, you'll need to consider the size and type of your pc case, which can significantly impact the amount of airflow required to keep your system at optimal operating temperatures. Additionally, the components inside your computer can play a role in determining the ideal fan curve, as some parts may generate more heat than others and require more aggressive cooling solutions.
Of course, your personal preferences are also a critical factor to consider. Some individuals may prefer to err on caution and opt for a more aggressive fan curve to ensure their components remain adequately cooled. In contrast, others may prioritize noise reduction and opt for a more relaxed fan curve to reduce the amount of fan noise generated by their system.
How To Know How Much Fan Curve Is Necessary?
Determining the optimal amount of PC fan curves to ensure your computer's temperature and noise levels are balanced requires a trial-and-error approach. Begin by creating a fan curve that you believe will perform optimally, then scrutinize the temperature and noise levels while engaging in regular use.
If you discover your temperature readings exceeding acceptable limits or your noise levels drowning out other sounds, adjust your fan curve accordingly. This iterative process may necessitate repeated modifications until you locate the perfect equilibrium for your system.
How Does Dust And Debris Impact Fan Speed And Temperatures?
When discussing the effects of dust and debris on PC fan curves, we're entering some complex territory. You see, when these pesky particles start to accumulate on your fans and heatsinks, things can get pretty wonky. The airflow becomes restricted, causing temperatures to skyrocket and your components to overheat. But that's not even the worst part. Your fans start to work overtime to compensate, leading to a whole lot of unnecessary noise pollution. Putting your pc on floor mat can cause attracting debris and dust.
What's the solution to this conundrum, you ask?
It's simple, you need to get in there and give your computer a good cleaning, paying extra attention to those fans and heatsinks. Trust me, you'll thank yourself later when your PC runs smoothly and quietly again.
Don'ts in adjusting fan curves
When it comes to tweaking your PC fan curves, there are a plethora of considerations you should take into account before tinkering with the settings. One of the critical factors to remember is that you should be cautious with your fan curve adjustments. If you push your fan curve to the limits, it could have a deleterious effect on the longevity of your PC components, not to mention leading to ear-piercing noise levels that are enough to make your head spin.
At the same time, you mustn't wholly disregard your fan curves. If you fail to implement a fan curve or do not configure it optimally, you risk encountering an array of issues, including overheating and component breakdowns. In other words, you want to avoid being left in a precarious position with a fan curve that's out of whack.
Why Does My Computer Fan Continue to Speed Up and Slow Down?
Your computer fans may be cycling rapidly (surging) and then decelerating (backing off) for seconds or minutes, even while you are not running resource-intensive applications. This condition is known as "fan hunting," which is one of the most frequent causes of fan-curve issues and is typically easy to resolve once you understand why the issue exists.
Why the problem occurs: You have an operating system temperature that is at a transitional temperature point in your fan curve. For example, if you have a fan curve that jumps from 30% fan speed at a temperature of 60°C to 70% fan speed at 65°C , if your idle temperature is approximately 62°C, the temperature will cross that threshold and the fans will increase their speed. After the temperature drops a couple of degrees (to 59°C), the fans will decrease their speed and the temperature will slowly climb again, repeating the process. As a result of this repetitive cycle, the fans will hunt endlessly and never achieve equilibrium.
Three solutions that work:
1. Gradually flatten the curve to eliminate the temperature transition zone. To illustrate this concept, if fan hunting is occurring at 62°C, create fan speed points of approximately 40%, 42%, and 45% at temperatures of 58°C, 62°C, and 66°C respectively. These small, gradual steps do not allow the temperature to fluctuate between two points.
2. Create a minimum fan speed floor. By establishing a minimum fan speed of 20–25%, you can ensure that your fans never completely shut down and start back up during normal operation. Although you will hear the fans at all times, they will operate much smoother and with fewer temperature swings compared to the irregular fan surging.
3. Adjust the hysteresis setting. Hysteresis refers to the amount of temperature reduction needed before the fan controller reduces fan speed after increasing it. In Fan Control, this is represented as the "Response Time" or "Step Down Delay." Applying a value of 4–6°C of hysteresis means the fans will no longer respond to temporary temperature changes and will remain at a consistent fan speed. BIOS fan controls on many ASUS and MSI boards contain a fan-step-down feature, for example, changing the Fan Step Down value from 0 to 0.5–1 second achieves the same result.
Fan hunting is not a sign that your hardware is faulty. It just means your curve has a steep step that happens to land right where your CPU or GPU idles. Smooth it out, add a speed floor, and the problem disappears.
Does Setting Fan Curves Decrease Temperature Of CPU/GPU
Fan curves, when deftly configured, have the capability to bring down the temperature of these components, thereby amplifying their performance and lifespan.
The rationale behind this is that when your components overheat, their efficacy plummets, and they can even incur damage over time. By judiciously using fan curves to regulate the temperature within your PC, you can ensure that your components operate at the temperatures they were designed for, which has a ripple effect of augmenting performance while concurrently mitigating the risk of harm.
Nevertheless, it's crucial to remember that configuring fan curves in isolation may not be a panacea for all the temperature-related issues your PC could be grappling with. Other variables are at play here, such as the quality of your cooling system and the layout of your components, which can impact temperature management. It may transpire that you have to dip into your pocket and invest in additional cooling solutions, such as liquid cooling or supplementary fans, to achieve optimal temperature control.
Liquid Cooling (AIO) Fans and Fan Curve Design Differences
When using a liquid (AIO) based cooler instead of an air-based cooler, you will find that your typical fan curve design cannot simply be followed as-is, and if done improperly, it will likely cause a reduction in cooling effectiveness without you being aware of it.
You have two parts of an AIO that you can individually adjust: the pump and the radiator fans. Each of these parts work independently and need to be adjusted separately.
Your pump should always operate at maximum speed. There's one big thing most users do incorrectly , setting a custom curve on your AIO pump. A custom curve tells the pump to only increase its speed at high temperatures. So when your CPU first begins to heat up, the coolant is moving very slowly through the entire loop. It isn't until the CPU reaches the trigger temperature that the heat buildup has already occurred. Run your pump at 80–100% speed at all times, or use a flat curve that never drops below 70%. The pumps included in a Corsair H150i or NZXT Kraken 360 are designed to run continuously , there is little to no audible difference in noise levels between 70% and 100% pump speed.
It is your radiator fans where you apply a fan curve. These are the fans attached directly to the radiator and they behave identically to case fans. A good initial fan curve for radiator fans:
- 30% at 40°C
- 50% at 60°C
- 75% at 75°C
- 100% at 85°C
Map the speed of your radiator fans to your CPU temperature, not a mixed sensor. The reason your radiator fans exist is to pull heat out of the coolant loop that your CPU is heating.
Lastly, within your BIOS, your pump header should be set to PWM mode, not DC mode. Typically, your motherboard will label the fan header occupied by your pump either CPU_OPT or AIO_PUMP. Be sure to plug your pump into the correct header. If your PC case is large enough to hold a 360mm radiator, double-check which fan header your pump is plugged into before making any changes.
Does Setting Higher Fan Curves Increase Noise?
Setting higher fan curves may be tempting to cool down those hot components, but it comes with a catch and increased noise levels. That's right, the faster the fans spin, the louder they get. It's a simple equation, but the solution is far from straightforward.
Here's the thing, though, not all fans are created equal. Some are naturally quieter than others, even at higher speeds. And let's remember about noise reduction features, such as specially-shaped blades or rubber dampeners. They can work wonders to quell the clamor of a rowdy fan, even when it's spinning at breakneck speeds.
But how do you find that sweet spot, the Goldilocks zone of temperature control and noise reduction? It's no small feat. You must consider the noise level of each individual fan and choose a fan curve that strikes the perfect balance. Sometimes, that may require a more aggressive curve to keep those temps down, while other times, a more subdued approach is warranted to avoid undue harm.
And remember, your fans won't be running at maximum speed all the time. They're smarter than that. They'll adjust themselves according to the load on your components.
Fan Curve Example
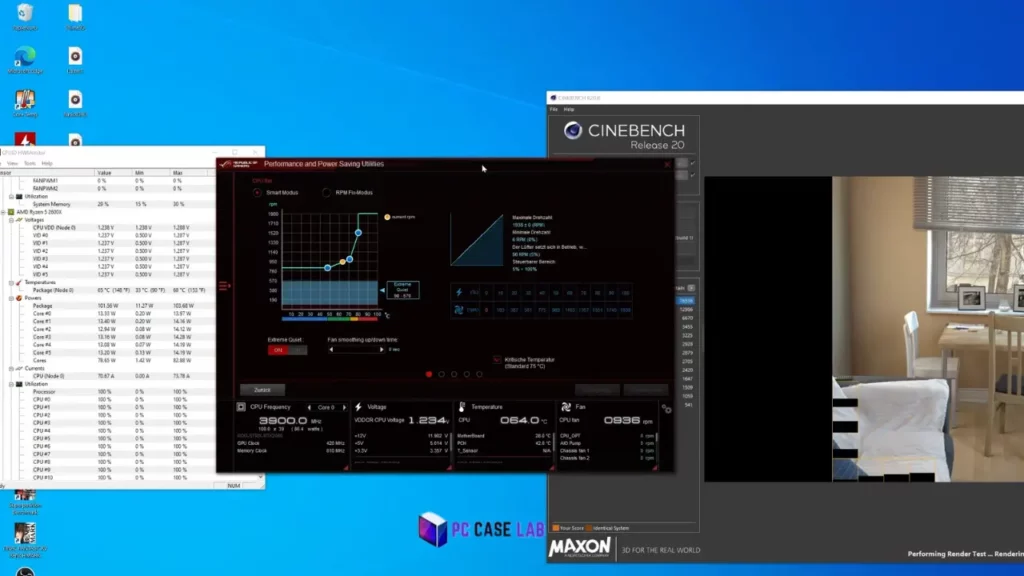
A fan curve example can help illustrate how fan curves work in practice. Let's say you have a gaming PC with an AMD Ryzen 5 CPU and an NVIDIA GeForce RTX 3070 GPU, and you want to set up a fan curve to regulate temperature and noise levels.
First, you must determine the temperature thresholds at which your fans want to start spinning faster. For example, you might set your CPU fan to spinning at 50°C and your GPU fan to spinning at 60°C.
Next, you need to determine the rate at which you want your fans to spin as temperatures increase. For example, you might set your CPU fan to increase speed by 10% for every 5°C increase and your GPU fan to increase speed by 15% for every 5°C increase in temperature.
Once you've determined these settings, you can input them into your fan control software and test the fan curve to ensure it regulates temperature and noise levels effectively. For example, run a stress test on your components to see how well the fan curve regulates temperatures and minimizes noise.
By using a fan curve example like this, you can see how setting up a fan curve can help regulate temperature and noise levels in your computer, leading to improved performance and longer component lifespan.
Recommended Fan Curve Settings:
Most people get caught staring at a blank chart trying to figure out where to start, with no clue what to enter. These examples of recommended settings will give you a baseline fan curve you can then experiment with, instead of having to guess where to begin.
These are baseline values, not final values. The characteristics of your case, room ambient temperature and quality of your cooler can affect each of these values. Begin with these, run a stress test and make adjustments accordingly.
Fan Curve – CPU – Air Cooling
Here's a reasonable starting point for most air-cooled CPUs:
- Idle/low-load (< 40°C): 20% fan speed
- Light-load (40–50°C): 30%
- Medium-load (50–65°C): 50%
- Heavy-load (65–75°C): 75%
- High-load (> 75°C): 100%
Reasoning behind this curve: Most new processors like the AMD Ryzen 7000 Series and Intel Core i9-14th Gen are designed to operate at elevated temperatures. There is no need for your fans to scream at 60°C, that is still within the safe operating range for most processors. Use the higher fan speeds only when they are needed.
Fan Curve – GPU – Gaming System
GPUs inherently have higher temperatures and most will utilize a 0 dB mode which turns off the fans at temperatures below 40–50°C. Here's a practical starting point for something similar to an NVIDIA GeForce RTX 4070 or AMD Radeon RX 7800 XT:
- Silent mode (temperature < 50°C): 0%
- Low-load (temperature = 60°C): 30%
- Moderate-load (temperature = 70°C): 50%
- Heavy-load (temperature = 80°C): 70%
- Critical-load (temperature > 90°C): 100%
If you're finding that your GPU is consistently reaching 85°C under heavy loads, consider raising the temperature level at 80°C to 80% fan speed. A 13°C drop in maximum temperature, such as what you would achieve by tightening your GPU fan curve, will typically keep your GPU from thermal throttling during extended gaming sessions on many cards.
Fan Curve – Case Fans – Overall Airflow
Since case fans are responsible for providing ambient airflow and are generally less demanding than your CPU or GPU fans, you should be able to use a less aggressive fan curve:
- Temperature < 40°C: 0–20%
- Temperature = 55°C: 30%
- Temperature = 70°C: 60%
- Temperature > 85°C: 100%
If you've got excellent airflow coming into your front panel on your PC case, you'll probably want to limit your case fan speed to 60% or lower during general gaming. Budget cases often have limited airflow and therefore will require a more aggressive fan curve beyond 65°C.
Consider these initial recommendations to be your first draft. Run a stress test using HWiNFO64 or GPU-Z to determine your actual temperatures, and then move the points until you find a comfortable balance between noise and cooling based upon how you use your system.
Conclusion
To wrap things up, configuring PC fan curves is a relatively straightforward and potent approach to regulating your computer's temperature and noise levels. You can employ fan control software to create bespoke fan curves that regulate the speed of your PC's fans according to predetermined temperature thresholds.
The benefit is that you can ensure that your system's components remain adequately chilled and operate seamlessly, all without generating excessive noise. Whether you're a serious gamer keen to achieve optimal performance or a power user looking to extend the lifespan of your rig's components, fan curves represent a powerful tool for enhancing your computer's overall functionality and robustness.
Frequently Asked Questions
You can control a fan curve using fan control software, which allows you to set custom temperature thresholds and fan speeds for your computer's fans. This software can typically be accessed through your computer's BIOS, motherboard software, or third-party software.
Yes, the fan curve is a helpful tool for regulating temperature and noise levels in your computer. Setting custom temperature thresholds and fan speeds ensures that your components stay cool and run smoothly without creating excessive noise. This can improve performance and extend the lifespan of your components.
The best software for controlling fan curves depends on your computer and its components. Many motherboards come with their own fan control software, and there are also third-party options like SpeedFan and MSI Afterburner. It's essential to do your research and choose software compatible with your computer and components, offering the features and customization options you need.
The default fan curve is the predefined fan behavior set by the motherboard or fan control software. It aims to provide a general balance between cooling and noise, but it might not be optimized for your specific system configuration.
Adjusting the fan curve itself does not pose significant risks. However, setting the fan speeds too low or too high can affect your system's cooling performance and potentially lead to overheating or excessive noise. It's essential to monitor your system's temperatures and ensure they remain within safe limits.
Yes, many motherboard BIOS or software interfaces allow you to save and load different fan curve profiles. This feature enables you to switch between profiles for different usage scenarios or experiment with various cooling configurations.